Fingerprint scanner - BioPod in OpenWrt
Some time ago my customer asked me to provide his access system not only with standard proximity-cards und touch-memory but also the access using fingerprints. I remember I had no time for this and no idea how to do this at all. Therefore I lost my client.
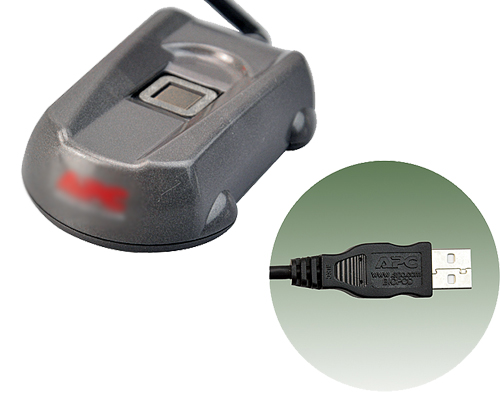
Recently I found the device USB BioPod from the company APC, this device has a biometrical sensor AES3500. Let’s try to connect it to the router and to get a picture with a fingerprint.
On the stage of configuration OpenWrt the following modules are to be selected:
Libraries:
<M> libjpeg
Utilities:
<M> jpeg-tools
There is no support in OpenWrt for APC USB Biopod.
Driver under Linux for APC USB Biopod we can download here: Thanks a lot to its authors. But to tell the truth we can see after its downloading that this version is not the latest one and cannot been built at once. The situation is aggravated with the absence of any kind of documentation about how to work with it.
While we started with the task we shouldn’t give up. To get the information about what an USB-driver is built of I searched in Google and came to the conclusion that everything is not so bad. It can be interesting for me to write a driver under Linux for APC BIOPOD, but I need for it a lot of time and datasheet for the sensor itself.
As a result spending a lot of time I got a working version. I will not describe here what and where should be edited, I just suggest to take my corrected version of Linux driver APC BIOPOD biopod_linux_drv.tar.bz2.
The only thing which should be pointed out is to build it using cross-compilator. How to do this you can see in Makefile. And by building you should perform: make testers (the utilities will be built), and then make(the module itself will be built).
We copy the directory biopod into the section MyData of the USB-stick (the section which is mounted to the directory home)
So let’s load and install the packages:
|
root@OpenWrt:/# opkg install bash bash-completion Installing bash (3.2-2) to root... Downloading ftp://ftp:ftp@192.168.0.9/bash_3.2-2_brcm47xx.ipk. Installing libncurses (5.7-3) to root... Downloading ftp://ftp:ftp@192.168.0.9/libncurses_5.7-3_brcm47xx.ipk. Installing bash-completion (20080705-1) to root... Downloading ftp://ftp:ftp@192.168.0.9/bash-completion_20080705-1_all.ipk. Configuring libncurses. Configuring bash. Configuring bash-completion. root@OpenWrt:/# opkg install libjpeg jpeg-tools Installing libjpeg (6b-1) to root... Downloading ftp://ftp:ftp@192.168.0.9/libjpeg_6b-1_brcm47xx.ipk. Installing jpeg-tools (6b-1) to root... Downloading ftp://ftp:ftp@192.168.0.9/jpeg-tools_6b-1_brcm47xx.ipk. Configuring libjpeg. Configuring jpeg-tools. |
Let’s go to the directory /home/biopod. Further we make a magic sequence of operations.
Load the module and check the output of the command lsmod:
|
root@OpenWrt:/home/biopod_dlink# ./biopod_load root@OpenWrt:/home/biopod_dlink# lsmod |grep bio biopod 9568 0 usbcore 103600 7 biopod,snd_usb_audio,snd_usbmidi_lib,usb_storage,ohci_hcd,ehci_hcd |
It isn’t hard to guess that the script biopod_unload unloads the module.
Further we connect the APC BIOPOD and check the outputs dmesg and ls:
|
root@OpenWrt:/home/biopod_dlink# dmesg usbcore: registered new interface driver biopod usb 1-1.2: new full speed USB device using ohci_hcd and address 4 USB Biopod device now attached to USBBiopod-192 root@OpenWrt:/home/biopod_dlink# ls /dev/bio* /dev/biopod0 |
The module has been downloaded. The device has been created. It seems to work! Let’s check...
Starting the script setdefaults.sh ( based upon the name — biopod AES3500 is configuring)
|
root@OpenWrt:/home/biopod_dlink# ./setdefaults.sh 80 1 0 0 0 0 0 0 0 0 0 0 0 0 0 0 0 0 0 0 0 0 0 0 0 0 0 0 0 0 0 0 0 0 0 0 0 0 0 0 0 0 0 0 0 0 0 0 0 0 0 0 0 0 0 0 0 0 0 0 0 0 0 0 0 0 0 0 0 0 0 0 0 0 0 0 80 0 81 0 82 0 83 10 84 7 85 7F 86 3 87 1 88 2 89 3 8A 5 8B 2F 8C 7A 8D 0 8E 20 8F 22 90 0 91 14 92 3 93 0 94 F 95 0 96 7F 97 4 98 20 99 0 0 0 0 0 9C 0 9D 0 9E 0 0 0 A2 2 A1 3 A7 8 A9 40 B4 5 BB 22 |
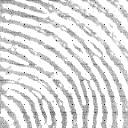
Create a finger mark. Put a finger to the sensor and start createFingerprints.sh:
|
root@OpenWrt:/home/biopod_dlink# ./createFingerprints.sh count0 fprint0 0 0 81 1 0 0 0 0 0 0 0 0 0 0 0 0 0 0 0 0 0 0 0 0 0 0 0 0 0 0 0 0 0 0 0 0 0 0 0 0 0 0 0 0 0 0 0 0 0 0 0 0 0 0 0 0 0 0 0 0 0 0 0 0 0 0 0 0 0 0 0 0 0 0 0 0 2 count = 8329 Starting ioctl based image retrievalioctl biopod_start called with retval 0 ioctl biopod_image called with retval -1 ioctl biopod_stop called with retval 0 count01 fprint01 0 0 81 1 0 0 0 0 0 0 0 0 0 0 0 0 0 0 0 0 0 0 0 0 0 0 0 0 0 0 0 0 0 0 0 0 0 0 0 0 0 0 0 0 0 0 0 0 0 0 0 0 0 0 0 0 0 0 0 0 0 0 0 0 0 0 0 0 0 0 0 0 0 0 0 0 2 count = 8329 Starting ioctl based image retrievalioctl biopod_start called with retval 0 ioctl biopod_image called with retval -1 ioctl biopod_stop called with retval 0 |
As a result there has been created a file with a finger mark. I have the following one: